 Save
Save My neighbor knocked on my door with a photo of her daughter in a cap and gown, and suddenly I was scrambling to come up with something special for a graduation party that weekend. I'd never decorated fondant before, but watching her face light up when I showed her these little mortarboard cookies made every sticky finger and fondant mishap worth it. They're easier than they look, I promise.
The first time I made these was for a small kitchen gathering where my friend's son was heading off to college. I'd made the cookies earlier that morning, and the smell of warm vanilla was still hanging in the air when people arrived. Watching someone bite into that little fondant hat and grin was when I realized these weren't just cookies anymore—they were memories you could actually eat.
Ingredients
- All-purpose flour: The backbone of these cookies, and you want it measured by weight if possible since it's more forgiving than guessing.
- Baking powder: Just enough to give the cookies a tender crumb without making them cake-like.
- Unsalted butter: Softened butter creams better and lets you control the salt, which is especially important when you're already working with fondant.
- Granulated sugar: This creates a slightly less tender cookie that holds its shape better when you're piling fondant on top.
- Egg: Binds everything together and adds richness without overwhelming the vanilla.
- Pure vanilla extract: The real stuff makes all the difference in what would otherwise be a plain sugar cookie.
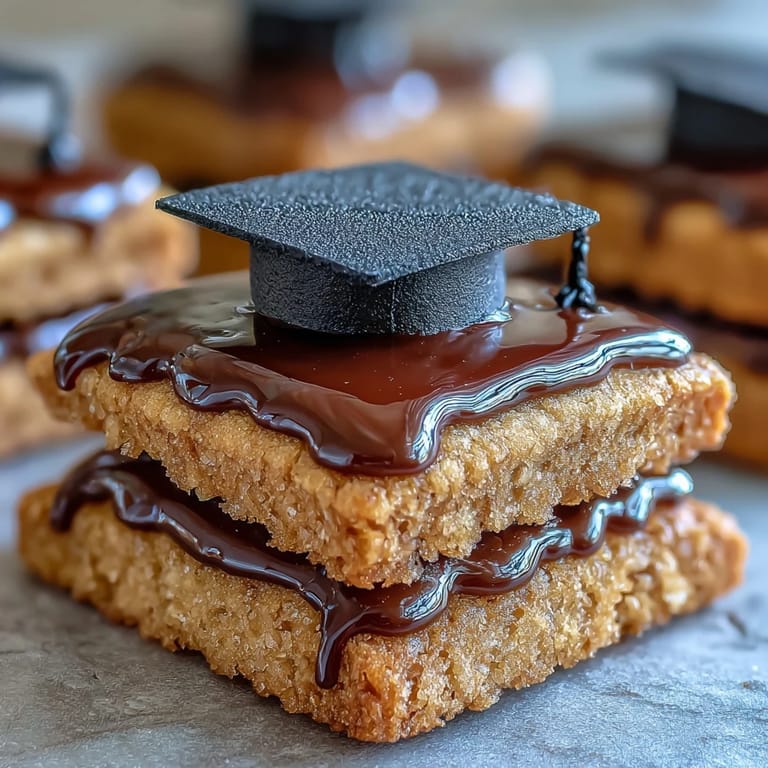
- Black fondant: You can use pre-colored fondant or color it yourself, but black is traditional for mortarboards and hides any fingerprints.
- Yellow fondant: The tiny tassels that make these feel finished, though you could use your school colors instead.
- Cornstarch: Your secret weapon for keeping fondant from sticking to everything while you're rolling and cutting.
- Powdered sugar icing: Acts as both glue and a soft finish that lets the fondant sit nicely on top.
Tired of Takeout? 🥡
Get 10 meals you can make faster than delivery arrives. Seriously.
One email. No spam. Unsubscribe anytime.
Instructions
- Start your oven and prep:
- Heat everything to 350°F and line your baking sheets with parchment paper so the cookies slide off without sticking. This is one of those steps that sounds obvious but saves you five minutes of frustration later.
- Mix your dry ingredients:
- Whisk flour, baking powder, and salt together in a bowl so the leavening is distributed evenly. This prevents lumps and ensures every cookie rises the same way.
- Cream butter and sugar:
- Beat them together for a good two to three minutes until the mixture looks pale and fluffy, like soft clouds. This is where the cookies get their tender texture, so don't rush it.
- Add egg and vanilla:
- Beat them in until you can't see any streaks of egg white, then scrape the bowl because the mixture tends to climb up the sides. You want everything fully incorporated before you add flour.
- Bring wet and dry together:
- Add the dry ingredients a little bit at a time and mix just until combined, then stop. Overmixing develops gluten and makes tough cookies, which is the last thing you want here.
- Roll and cut:
- Flour your surface lightly, roll the dough to about a quarter inch thick, and cut into rounds or squares. The thickness matters because thinner cookies crisp up while thicker ones stay chewy.
- Bake until golden:
- Watch for the edges to turn just golden brown, about ten to twelve minutes. They'll seem underdone when you pull them out, but they keep cooking on the hot pan.
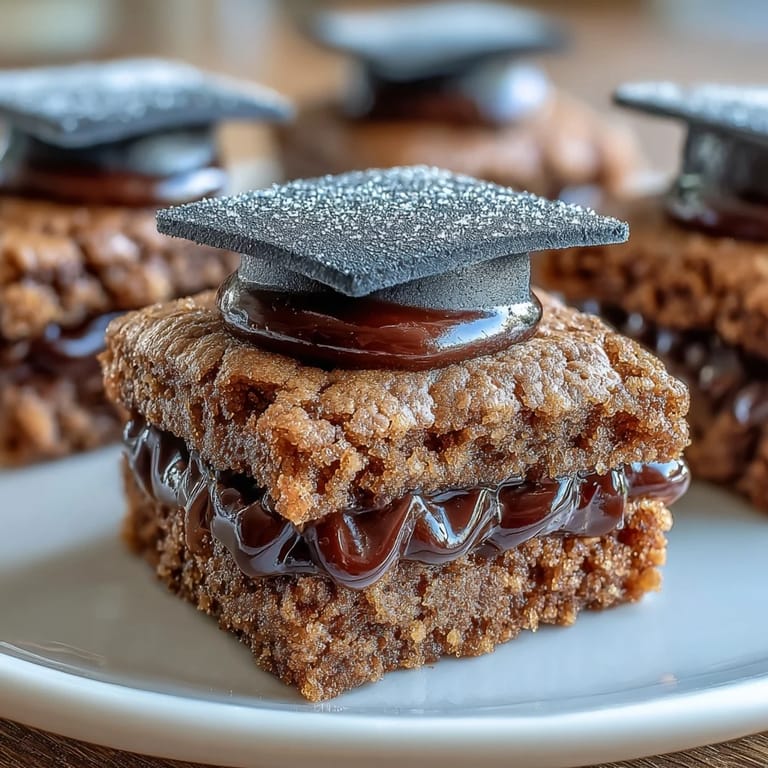
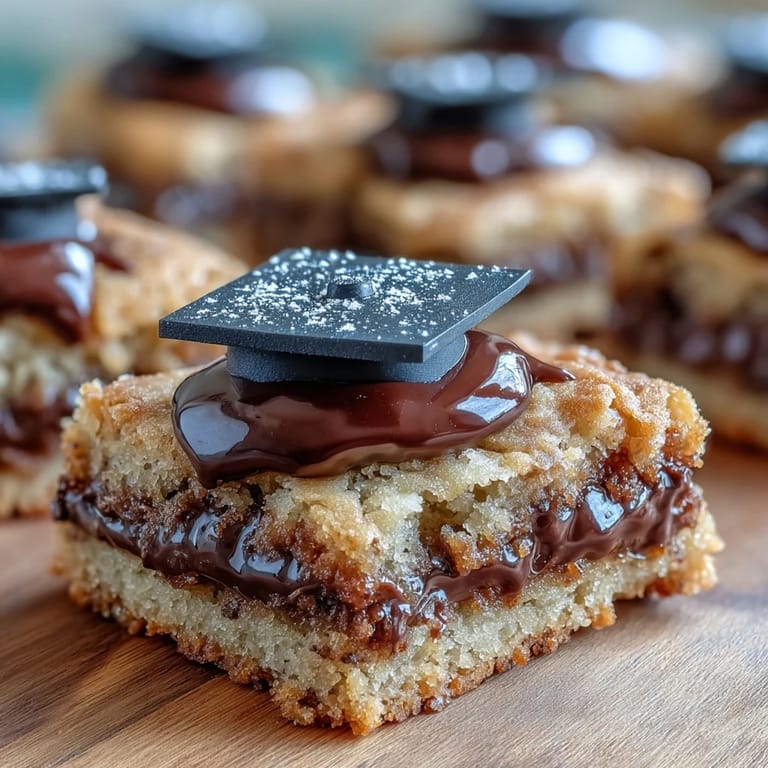
- Prepare your fondant decorations:
- While cookies cool, roll black fondant thin and cut twenty-four small squares for the mortarboard tops, plus tiny cylinders for the bases. Dust with cornstarch as you work so nothing sticks together.
- Make the tassels:
- Roll yellow fondant into thin ropes and snip them into one-inch pieces, then shape them into little dangles. These are the detail that makes people stop and ask how you did it.
- Mix your icing:
- Combine powdered sugar, milk, and vanilla until you have something the consistency of toothpaste. It should be spreadable but thick enough to hold fondant in place.
- Assemble the mortarboards:
- Once cookies are completely cool, pipe or spread a little icing in the center of each one, then place a fondant square on top. Slide a fondant cylinder underneath for the cap base, then add your tassel with another dab of icing.
- Let everything set:
- Give the decorations twenty to thirty minutes to firm up before you package them. This prevents them from sliding around in a box.
 Save
Save There's something unexpectedly emotional about turning a simple cookie into a celebration of someone's accomplishment. I've made these for engineering students and art majors, kindergarten promotions and PhD candidates, and every time someone bites into one, there's this moment of pure joy. That's the real magic here—not the fondant or the technique, but the fact that you made something that says you care enough to show up.
Making Fondant Work Without Stress
Fondant intimidates people because it feels fancy and unforgiving, but it's actually just sugar paste that's way more flexible than you think. The key is not overthinking it—dust as you go, work on a clean surface, and remember that small imperfections actually make these cookies look more handmade and charming. If you've never worked with fondant before, these cookies are honestly a perfect low-stakes place to learn since nobody expects precision from a graduation cookie.
Customizing for Your School or Event
The beauty of these cookies is that they're a blank canvas for whatever colors matter to your graduate. Swap the yellow tassels for your school colors, or use fondant in shades that match the ceremony dress code, or even add tiny initials by hand-rolling fondant into letters. I once made a batch where the mortarboards were deep red and gold, and people kept asking where I'd ordered them from.
Storage and Sharing
These cookies stay fresh in an airtight container for about five days, which gives you a window to bake ahead and decorate the night before if you're organized enough. Package them in a nice box or jar with tissue paper, and they become a gift that feels personal and homemade in the best way possible.
- Store unfrosted cookies separately from frosted ones if you're planning to keep them beyond a day or two, since the icing can get sticky.
- If you're mailing these to someone, let the fondant decorations set completely before wrapping, and pack them in a sturdy container with padding so they survive the journey.
- These freeze beautifully unfrosted for up to three weeks, so you can make the cookies weeks ahead and decorate them a few days before the event.
 Save
Save These cookies have become my go-to for every milestone I'm invited to celebrate, and I've yet to have someone ask for the recipe who didn't seem genuinely delighted when I said yes. That's how you know you've made something worth making again and again.
Recipe FAQs
- → How do I make the fondant mortarboard decorations?
Roll black fondant thinly and cut into small squares for the mortarboard tops. Shape small cylinders for the bases and create yellow tassels by rolling and cutting thin ropes. Attach pieces using icing.
- → Can I prepare the dough ahead of time?
Yes, you can make the dough in advance and chill it for up to 24 hours before baking to maintain freshness and shape.
- → What is the best way to store these cookies?
Store in an airtight container at room temperature for up to 5 days to keep them soft and maintain decoration integrity.
- → Are there alternative decorating options?
You can use colored icing or edible markers to draw designs instead of fondant for a quicker decoration method.
- → Can I substitute ingredients for dietary needs?
Yes, gluten-free flour or dairy-free butter can replace standard ingredients. Make sure to check fondant ingredients for allergens accordingly.