 Save
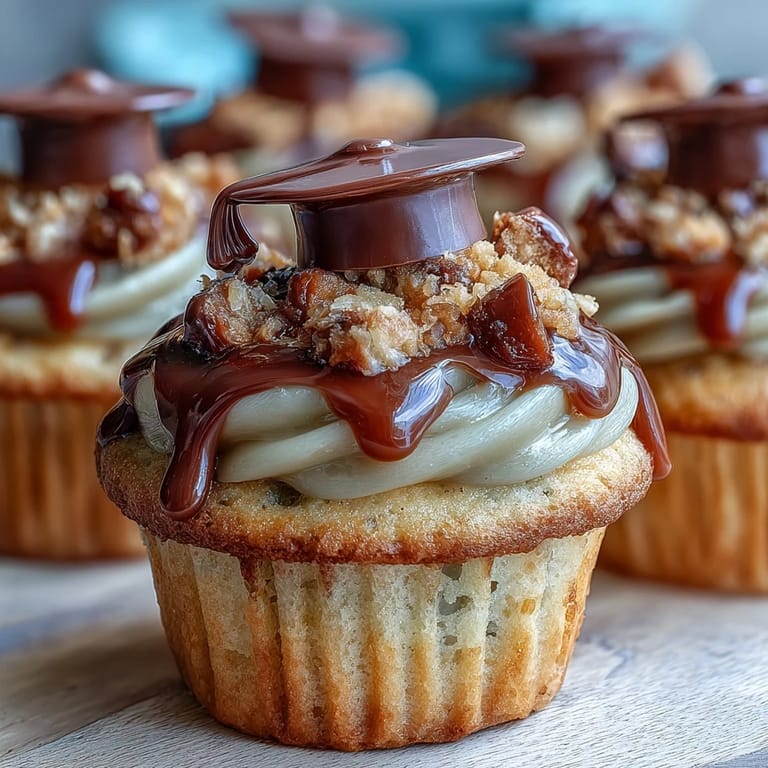
Save My cousin called me in a panic two weeks before her graduation, asking if I could bring something to her backyard celebration. She wanted cupcakes but with a twist, something that screamed achievement without requiring a culinary degree. That's when I started playing with the idea of edible graduation caps perched on top of frosted cupcakes, and honestly, the whole thing came together so naturally that I wondered why I hadn't thought of it sooner.
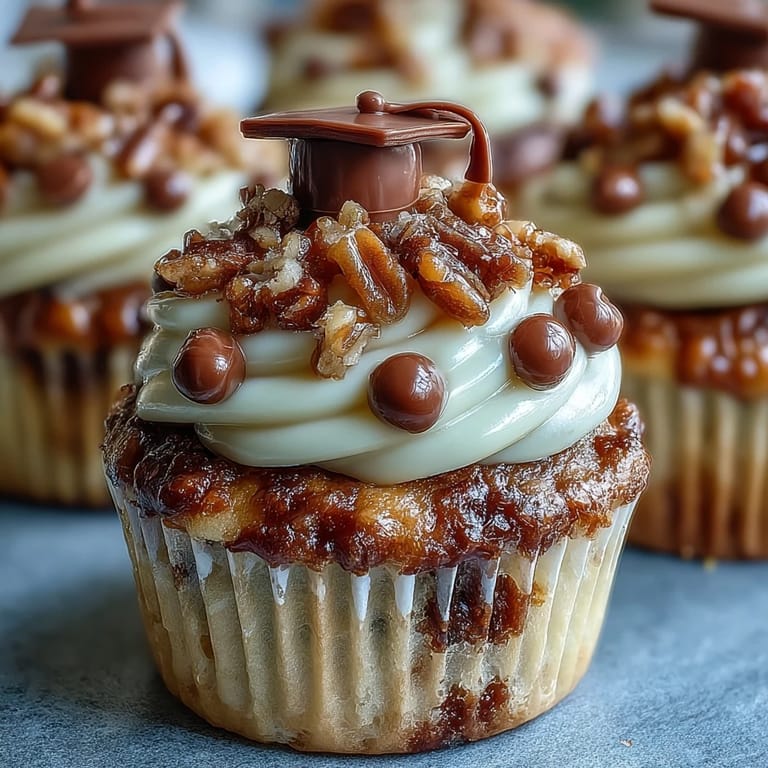
I'll never forget watching my cousin's face light up when she saw those cupcakes arranged on the dessert table, each one topped with a tiny chocolate mortarboard and tassel. Her friends started grabbing them immediately, and someone even asked if I did this professionally, which made me laugh because I was basically winging it with candies from the grocery store.
Ingredients
- All-purpose flour: The foundation of everything, and I've learned that measuring by weight is worth the extra thirty seconds if you want consistent results.
- Granulated sugar: This sweetens the batter and helps create that tender crumb, so don't skimp on quality here.
- Unsalted butter, softened: Room temperature is non-negotiable, and I always leave mine on the counter for a solid hour before baking.
- Large eggs: These bind everything together and add richness, so crack them into a separate bowl first to catch any shells.
- Whole milk: The liquid component that keeps the batter from being too dense, and it plays nicely with the vanilla.
- Baking powder: Your leavening agent, and checking the expiration date actually matters more than people realize.
- Salt: A pinch enhances all the flavors and prevents the sweetness from becoming one-dimensional.
- Pure vanilla extract: The flavor backbone that makes people say these taste homemade, which they are.
- Powdered sugar, sifted: Sifting removes lumps and makes frosting silky smooth, a small step that changes everything.
- Mini peanut butter cups or chocolate squares: These form the base of your graduation caps, and you can swap them out depending on what's available or any allergies in the crowd.
- Chocolate square candies: The actual mortarboard portion, flat and sturdy enough to hold the tassel.
- String licorice or sour candy strips: Your tassel, and honestly any long, thin candy works beautifully here.
- Mini M&Ms or candy pearls: The tiny button that sits on top, adding just enough visual detail to make these feel intentional.
Tired of Takeout? 🥡
Get 10 meals you can make faster than delivery arrives. Seriously.
One email. No spam. Unsubscribe anytime.
Instructions
- Get your oven ready and prepare the stage:
- Preheat to 350°F and line your muffin tin with paper liners, which prevents sticking and makes cleanup wonderfully easy. This only takes two minutes but saves you from cupcake disasters later.
- Cream the butter and sugar until fluffy:
- This is where air gets incorporated into your batter, so spend a good two to three minutes really beating these together until the mixture is pale and noticeably lighter. You'll know you're done when it looks almost like frosting itself.
- Add eggs one at a time with vanilla:
- Beating them in individually ensures even distribution, and the vanilla blends smoothly into the mixture. This step takes patience but it matters.
- Dry ingredients go in three stages:
- Combine flour, baking powder, and salt in a separate bowl, then alternate adding them with the milk to your wet mixture, starting and ending with dry ingredients. This prevents overmixing, which would make your cupcakes tough.
- Divide batter and bake:
- Fill liners about two-thirds full, then slide into the oven for 18 to 20 minutes until a toothpick emerges clean. The smell during baking is honestly half the joy.
- Cool completely before frosting:
- Patience here prevents melted frosting disasters, so let them sit at room temperature for at least 30 minutes. I usually make the frosting while they cool.
- Beat frosting into clouds:
- Softened butter goes first, then powdered sugar gradually, then milk and vanilla. Beat for a full three to four minutes until it's fluffy and spreadable, which transforms the texture entirely.
- Frost with a generous swirl:
- Use a piping bag or just a spoon to create peaks and swirls, which looks more celebratory than a flat surface. This is where you can add food coloring to match school colors if you want extra flair.
- Assemble graduation caps with chocolate:
- Melt a little chocolate or use frosting as glue to attach the mini peanut butter cup upside-down onto the chocolate square base, then stick the licorice tassel on the side and the candy button on top. Let everything set for a few minutes before placing caps on cupcakes.
 Save
Save There's something almost magical about watching someone take a bite of a cupcake topped with an edible graduation cap, because suddenly dessert becomes a small celebration all on its own. In that moment, food stops being just food and becomes part of a memory.
Working with the Graduation Cap Design
The beauty of these caps is that they're forgiving and customizable. I've made them with different candies depending on what the grocery store had in stock, and they always look intentional. The key is assembling them on a flat surface before placing them on the cupcakes, which gives you stability and prevents them from sliding around.
Storing and Serving These Cupcakes
Unfrosted cupcakes last for about three days in an airtight container, which means you can bake ahead if your event is a few days away. Frosted cupcakes with the cap toppers are best consumed within two days, and if it's warm outside, keep them cool in the fridge but bring them to room temperature before serving so the frosting tastes creamy rather than stiff.
Making These Your Own
School colors matter, so don't hesitate to tint your frosting with gel food coloring to match the graduate's college or high school. The caps themselves can use any candies you find appealing, and I've seen versions with sprinkles, edible glitter, and even tiny fondant scrolls. One friend even made hers with chocolate-covered pretzels instead of licorice for the tassels, and they looked stunning.
- Add a tiny fondant diploma scroll as an optional detail if you want to make them even more special.
- Consider making a test batch a day or two before so you know exactly how the assembly feels and how long it takes.
- These freeze beautifully unfrosted, so you could make the cupcakes weeks ahead if you're really planning ahead.
 Save
Save These cupcakes represent the kind of baking that feels personal without being complicated, which is exactly what a celebration should taste like. Make them, share them, and watch people smile when they realize dessert just became part of the ceremony.
Recipe FAQs
- → What ingredients create the cupcake base?
The cupcakes use all-purpose flour, sugar, butter, eggs, milk, baking powder, salt, and vanilla extract for a tender, moist texture.
- → How is the buttercream frosting prepared?
Butter is beaten smooth, then powdered sugar, milk, vanilla, and a pinch of salt are added gradually until fluffy and spreadable.
- → What components are used for the graduation cap toppers?
Mini peanut butter cups or chocolate squares serve as bases, with chocolate square candies, licorice strips for tassels, and mini candies as buttons.
- → Can these cupcakes be adapted for nut allergies?
Yes, using chocolate square candies instead of peanut butter cups avoids nuts in the toppers.
- → How should the cupcakes be stored after preparation?
Store them in an airtight container at room temperature for up to two days to maintain freshness and texture.
- → Is it possible to customize the frosting colors?
Yes, food coloring can be added to the frosting to match school or event colors for a personalized touch.