 Save
Save Last November, my sister texted a photo of a turkey-shaped bread she'd seen at a farmer's market, and I couldn't stop thinking about it. The idea of shaping sourdough into something festive felt a little intimidating at first, but once I understood it was just gentle sculpting with dough I already knew how to make, I was hooked. Now every holiday gathering has one sitting proudly on the table, and honestly, people are more excited to photograph it than to eat it, even though the crusty exterior and tangy crumb are what really steal the show.
I made this for a Friendsgiving three years ago, and watching everyone's faces when they walked into my kitchen and saw this golden turkey loaf sitting on the counter was absolutely worth the extra shaping time. One friend asked if I'd bought it from a bakery, which meant everything to me in that moment. Since then, it's become the one dish people specifically request when I host.
Ingredients
- Bread flour, 500 g: The backbone of your loaf, giving structure and chew. Use a good quality flour if you can find it, as it makes a noticeable difference in gluten development.
- Water, 350 g at room temperature: Cool water helps you control fermentation timing, which is crucial for shaping when the dough is still manageable but strong enough to hold details.
- Active sourdough starter, 100 g at 100% hydration: This is your leavening and flavor, so make sure it's bubbly and vigorous before you use it, ideally fed 4 to 8 hours before mixing.
- Fine sea salt, 10 g: Don't skip this or use table salt, as sea salt dissolves more evenly and won't create hard specks in your final crumb.
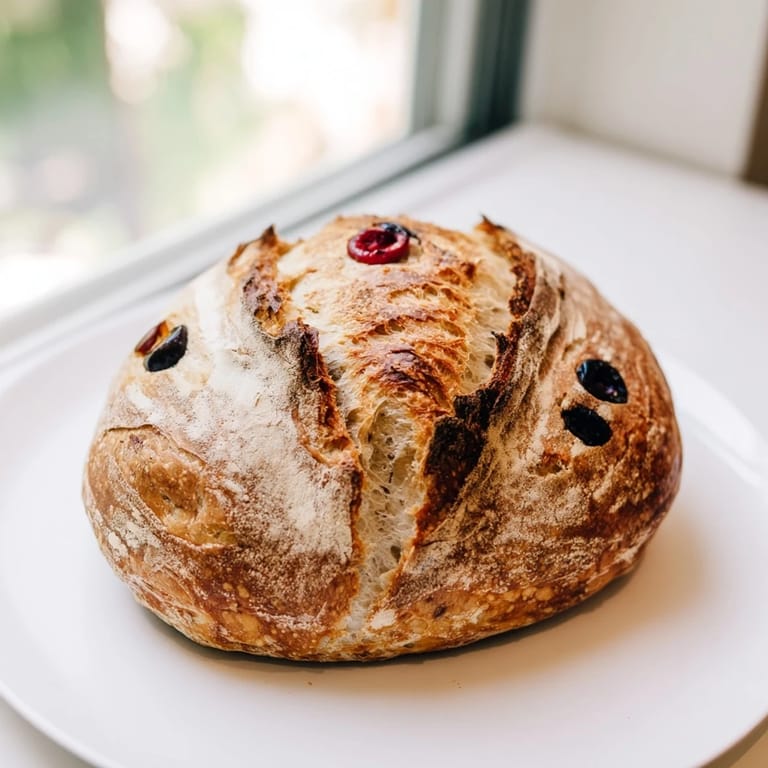
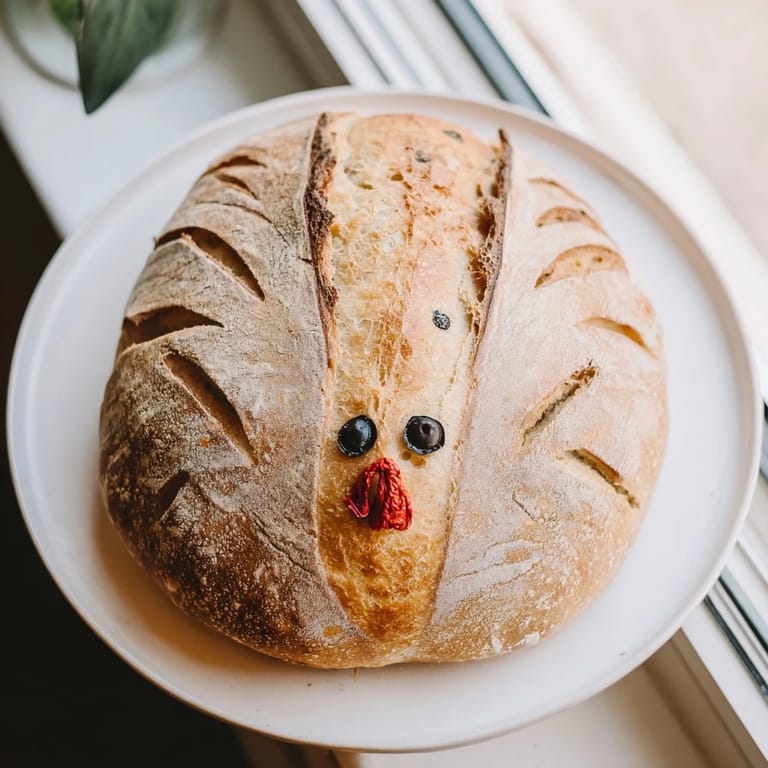
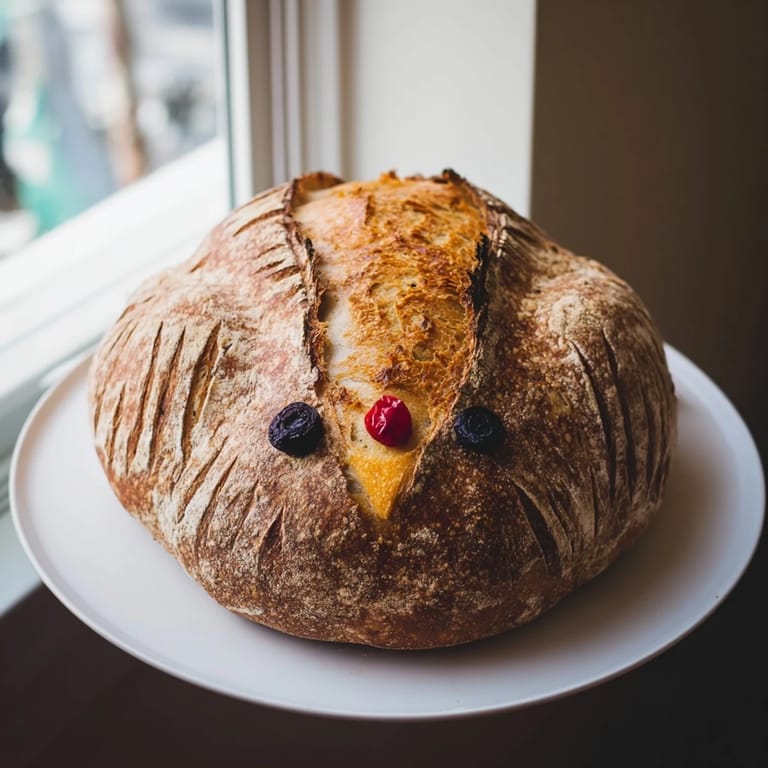
- Black olives or peppercorns for eyes: These tiny details make the turkey recognizable at a glance, so choose ones that won't slip off the damp dough.
- Red bell pepper or dough for wattle: A small curved piece of fresh pepper adds color and a whimsical touch, though using a pinch of dough and a brush of tomato paste works beautifully too.
- Egg for wash, optional: Skip this entirely for vegan versions, or substitute with a light brush of plant milk mixed with a touch of maple syrup for subtle shine.
- Seeds for feather accents: Poppy, sesame, or flax seeds scattered on top before baking create visual texture and a nice nutty flavor layer.
Tired of Takeout? 🥡
Get 10 meals you can make faster than delivery arrives. Seriously.
One email. No spam. Unsubscribe anytime.
Instructions
- Mix flour and water, then rest:
- Combine your flour and room-temperature water in a large bowl until there are no dry pockets. This autolyse period of 30 to 45 minutes lets the flour fully hydrate and makes the dough easier to work with once you add the starter.
- Bring in the starter and salt:
- Add your active sourdough starter and sea salt to the rested dough, then mix thoroughly until everything is incorporated evenly. The dough will feel shaggy but cohesive.
- Stretch and fold for strength:
- Over the next 2 hours, perform 3 to 4 sets of stretch and folds, spacing them about 30 minutes apart. Wet your hand, grab one side of the dough, stretch it up and fold it over itself, then rotate the bowl and repeat four times per set, building the gluten network.
- Let it bulk ferment and rise:
- Cover your bowl and leave it at room temperature, ideally between 21 and 23 degrees Celsius, for 5 to 7 hours. You're looking for the dough to roughly double in volume and show plenty of bubbles on the surface and sides.
- Shape the turkey body and head:
- Turn the dough onto a lightly floured surface and gently divide it visually into sections: one large oval for the body, a smaller round for the head, and several teardrop shapes for tail feathers and wings. Work gently so you don't deflate the airy crumb you just developed.
- Assemble your turkey loaf:
- Place the oval body on parchment paper, then use a bit of water as glue to attach the round head. Arrange the teardrop feathers around and behind the body to create a fanned tail, and position the wing shapes on the sides. Use a sharp knife or bread lame to score delicate feather details into the dough.
- Add personality with eyes and wattle:
- Press olive pieces or peppercorns gently into the head for eyes, making sure they stick well. Shape a small curved wattle from red bell pepper or a tiny piece of dough and tuck it under the head for that classic turkey look.
- Let it proof until puffy:
- Cover the assembled loaf loosely with a kitchen towel and proof at room temperature for 1 to 2 hours until it looks slightly puffy but not completely doubled. You want it to spring up in the oven, not deflate.
- Preheat your oven for maximum oven spring:
- Place your baking stone or steel on the middle rack and heat your oven to 230 degrees Celsius for at least 30 minutes. A truly hot stone makes all the difference in how much your shaped loaf expands.
- Egg wash and seed it if desired:
- Brush the assembled turkey lightly with egg wash or plant milk mixture, and scatter seeds across the feathers for visual appeal and a subtle flavor accent. This step is entirely optional but does create a beautiful golden sheen.
- Bake with steam, then dry heat:
- Slide your parchment-lined turkey onto the preheated stone using a pizza peel or large flat spatula. Bake for 20 minutes with steam (you can create steam by tossing a handful of ice cubes onto the oven floor or spraying the sides), then reduce the heat to 200 degrees Celsius and bake for another 20 minutes until the loaf is deep golden brown and sounds hollow when you tap the bottom.
- Cool completely before slicing:
- Transfer your turkey to a wire rack and let it cool fully, at least an hour, before you cut into it. The crumb continues to set as it cools, and cutting too early will give you a gummy texture.
 Save
Save Watching my niece carefully place the olive eyes on the turkey loaf while the oven preheated, completely focused and serious about getting them perfectly placed, reminded me that food is as much about the people and moments around it as it is about the final taste. That's when this recipe stopped being about impressing people and started being about creating memories together.
Fermentation Timing and Temperature Matter More Than You Think
The bulk fermentation window is longer than many recipes because sourdough truly depends on your kitchen temperature, the age of your starter, and even the season. In winter, it might take closer to 7 hours for the dough to reach that perfectly bubbly state, while in summer, 5 hours might be your sweet spot. If you poke the dough gently and it springs back slowly but leaves a slight indent, you're in the zone.
Shaping is Storytelling, Not Precision
There's a freedom in knowing that your turkey doesn't need to look perfect to be charming. One of my loaves had slightly uneven wings and a lopsided head, and it became the most photographed version I've ever made because it had character. The beauty is in the handmade quality, so lean into that instead of fighting against it.
Vegan and Allergen Friendly Variations
This loaf is naturally vegan if you skip the egg wash and use plant milk or water as your glue for assembly. You can brush it with a diluted aquafaba solution or simply leave it unglazed for a more rustic look. For decorations, use whole seeds pressed gently into the dough before baking, or keep the olives and peppers as your only embellishments.
- Brush with oat milk mixed with a tiny drizzle of maple syrup for a subtle golden finish without any animal products.
- Toast your seeds lightly before sprinkling them on top so they stick better and add toasted depth to the flavor.
- If you're baking for someone with gluten sensitivity, you can experiment with a high-quality gluten-free bread flour blend, though the texture will be different and may require slightly less water.
 Save
Save There's something deeply satisfying about pulling a turkey-shaped sourdough from the oven that you shaped with your own hands, and even more satisfying to watch it get devoured by people who came for the novelty but stayed for the taste. Make this when you have time to enjoy the process, and it becomes less of a recipe and more of a tradition.
Recipe FAQs
- → How long does the fermentation process take?
The dough requires approximately 5–7 hours of bulk fermentation at room temperature (21–23°C), followed by 1–2 hours of final proofing. Total time from mixing to baking is 11–13 hours, including the initial 30–45 minute autolyse rest.
- → Can I make this loaf vegan?
Yes, this loaf is naturally vegan. Simply skip the egg wash or substitute with plant-based milk brushed on before baking. Seeds can replace egg wash for a golden finish and decorative feather texture.
- → What is the purpose of the autolyse step?
The 30–45 minute autolyse allows flour to fully hydrate before salt is added. This develops better gluten structure, improves dough extensibility, and enhances overall crumb development and flavor complexity.
- → Why use a baking stone for this bread?
A preheated baking stone or steel distributes heat evenly, promoting rapid oven spring and achieving a crispy, golden-brown crust. It also helps create steam conditions that enhance crust development during the initial baking phase.
- → How can I enhance the flavor of the dough?
Mix fresh or dried herbs like rosemary or thyme directly into the dough during the initial mixing stage. Alternatively, brush the shaped loaf with herb-infused oil before proofing, or sprinkle seeds mixed with herbs as final garnish.
- → What temperature should the dough reach before shaping?
The dough should double in size and show visible bubbles throughout when bulk fermentation is complete. It should feel airy and slightly jiggly, indicating sufficient fermentation at 5–7 hours, depending on room temperature and starter strength.