 Save
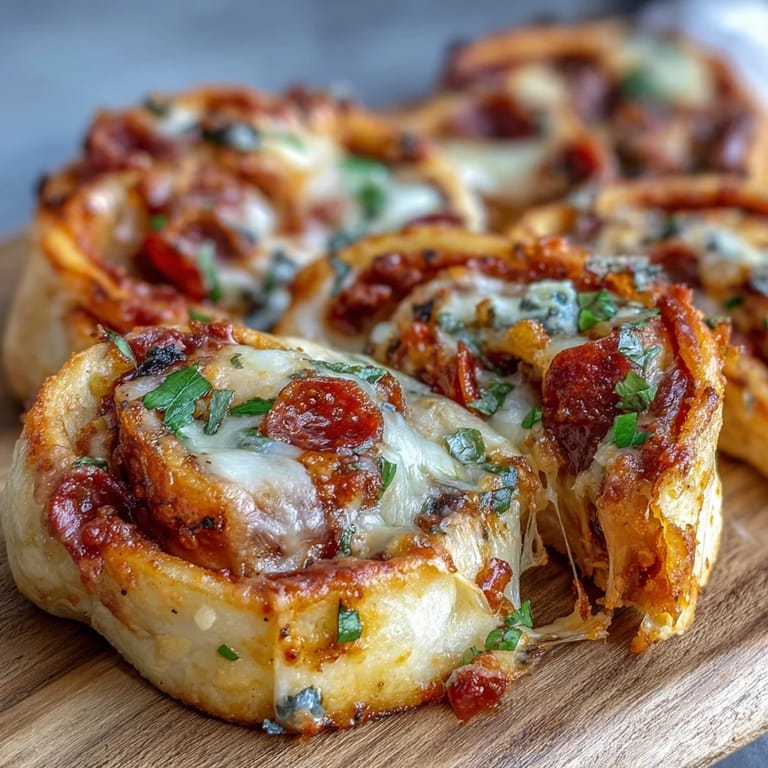
Save My daughter burst into the kitchen one Saturday morning asking if we could turn pizza into something she could eat with her hands during her soccer game. I stared at the tortillas on the counter, then at the leftover pizza sauce in the fridge, and suddenly it clicked. Twenty minutes later, we had golden spirals cooling on the counter, cheese still bubbling at the seams. She grabbed one before I could even slice them, burned her tongue a little, and declared me a genius.
I started making these for every casual gathering after a potluck where I watched people abandon fancy appetizers to hover around my tray. A neighbor asked if I used puff pastry, convinced something this good required more effort. When I told her it was just tortillas, she laughed and said she was annoyed at how simple it was. That became my favorite compliment.
Ingredients
- Large flour tortillas: Choose soft, pliable ones that won't crack when rolled, and avoid the overly thin varieties that tear under the weight of toppings.
- Cooking spray or olive oil: A light brush of oil gives the tortillas that golden, crisp finish that makes them look bakery-worthy.
- Pizza sauce: Use a thick sauce so it doesn't soak through the tortilla, I learned this after my first batch turned soggy halfway through baking.
- Shredded mozzarella cheese: Pre-shredded works fine, but block mozzarella you shred yourself melts into those long, dramatic cheese pulls everyone loves.
- Diced pepperoni: Cutting it into small pieces distributes the flavor evenly and prevents giant pepperoni pockets that slide out when you bite in.
- Sliced black olives: These add a salty, briny contrast that balances the richness of the cheese without overpowering the other flavors.
- Diced bell peppers: Any color works, but I like red or yellow for a hint of sweetness that brightens each bite.
- Garlic powder: Just a pinch deepens the flavor without the hassle of mincing fresh garlic, and it distributes more evenly.
- Italian seasoning: This herb blend brings that classic pizza aroma to your kitchen as they bake.
- Red pepper flakes: Optional, but a small sprinkle adds warmth without making things spicy, perfect for adults who want a little kick.
Tired of Takeout? 🥡
Get 10 meals you can make faster than delivery arrives. Seriously.
One email. No spam. Unsubscribe anytime.
Instructions
- Preheat and Prep:
- Set your oven to 400°F and line a baking sheet with parchment paper so the cheese doesn't weld itself to the pan. Trust me, cleanup becomes a breeze.
- Spread the Sauce:
- Lay a tortilla flat and spread a quarter cup of pizza sauce across it, leaving a half-inch border so the filling doesn't ooze out the sides when you roll. Work quickly so the tortilla doesn't get soggy.
- Layer the Cheese and Toppings:
- Sprinkle half a cup of mozzarella evenly, then scatter pepperoni, bell peppers, and olives on top. Don't overload it or the roll won't close properly.
- Season:
- Dust with garlic powder, Italian seasoning, and a pinch of red pepper flakes if you like a little heat. This step takes five seconds but makes a noticeable difference.
- Roll Tightly:
- Start at one edge and roll the tortilla snugly, tucking the filling in as you go to create a neat spiral. If it feels loose, it will unravel in the oven.
- Repeat:
- Assemble the remaining three tortillas the same way, keeping your workspace tidy so ingredients don't end up everywhere. I usually set up an assembly line.
- Brush and Arrange:
- Place each roll seam-side down on the baking sheet and brush the tops lightly with olive oil or spray them. This is what gives you that golden, crispy exterior.
- Bake:
- Slide the sheet into the oven for 15 to 20 minutes, watching for the tops to turn golden and the cheese to bubble out slightly. Your kitchen will smell incredible.
- Cool and Slice:
- Let the rolls sit for a few minutes so the cheese sets just enough to hold together, then slice each one into bite-sized rounds. A sharp knife works best.
- Serve:
- Arrange the slices on a platter with extra pizza sauce on the side for dipping. They disappear fast, so consider making a double batch.
 Save
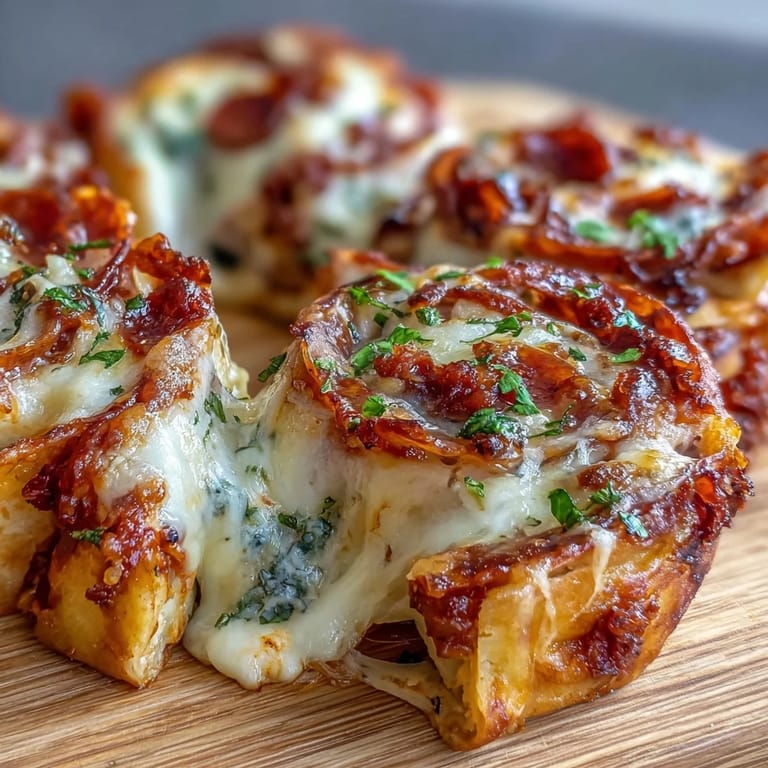
Save One evening, my son asked if we could make these for his birthday party instead of ordering pizza. I was surprised, but when I saw his friends devouring them and asking for the recipe to take home, I realized these little spirals had become more than a quick dinner. They were the thing people remembered, the recipe that got requested again and again.
Make Ahead Magic
I assemble these rolls in the morning, cover them tightly with plastic wrap, and stash them in the fridge until dinnertime. You can even freeze them unbaked on a tray, then transfer to a freezer bag once solid. Bake straight from frozen, adding just a few extra minutes, and nobody will know you prepped them days ago. It is the kind of trick that makes weeknight cooking feel effortless.
Topping Swaps
After making these dozens of times, I have learned that almost any pizza topping works. Cooked sausage, sautéed mushrooms, fresh spinach, even pineapple if that is your thing. My husband loves a version with chicken, bacon, and ranch drizzle. The base method stays the same, so feel free to raid your fridge and experiment. Just keep the moisture level in check so your tortillas don't get soggy.
Serving Suggestions
These rolls shine at room temperature, which makes them ideal for picnics, lunchboxes, or game day spreads. I have served them alongside a simple green salad for a light dinner, or piled them on a platter with marinara, ranch, and garlic butter for dipping. They are sturdy enough to hold up during transport, and people love the handheld format.
- Pair with a crisp Caesar salad and garlic knots for a full Italian-inspired meal.
- Pack them in a thermos-style container to keep warm for school lunches or road trips.
- Serve with a variety of dipping sauces like pesto, buffalo ranch, or honey sriracha for a fun appetizer spread.
 Save
Save Every time I pull these out of the oven, someone in my house appears in the kitchen as if summoned by the smell alone. They have become our go-to for busy nights, lazy weekends, and everything in between, and I hope they bring the same easy joy to your table.
Recipe FAQs
- → How do I keep the tortilla rolls from unrolling while baking?
Roll the tortillas tightly and place them seam-side down on the baking sheet. Brushing the tops with olive oil helps seal the edges. The melted cheese also acts as a natural adhesive to hold everything together.
- → Can I make these ahead of time?
Yes, assemble the rolls and freeze them unbaked. When ready to enjoy, bake directly from frozen, adding 3-5 extra minutes to the cooking time. This makes them perfect for party prep.
- → What other toppings work well in these spiraled tortillas?
Cooked sausage, mushrooms, spinach, diced onions, or jalapeños all work beautifully. Try different cheese blends like cheddar, pepper jack, or a Italian mix for variety. Just keep the portions moderate so they roll easily.
- → How do I achieve the crispiest tortilla exterior?
Brush the tops lightly with olive oil or cooking spray before baking. Ensure the oven is fully preheated to 400°F and bake until golden brown. Avoid overcrowding the baking sheet, which traps steam and prevents proper crisping.
- → What's the best way to slice the rolls for serving?
Let the baked rolls cool for about 5 minutes before slicing. Use a sharp knife and cut into 1-inch pinwheels. This allows the cheese to set slightly, creating cleaner slices while maintaining the gooey texture inside.
- → Can I use corn tortillas instead of flour?
Corn tortillas are more prone to cracking when rolled. If using corn, warm them first to increase pliability. Flour tortillas yield the best results due to their flexibility and ability to become crispy without breaking.